
How do I register DOIs for my journal?
NOTE: this article is only for journals that do not employ ]u[ Ubiquity production services to register DOIs.
DOIs are the Digital Object Identifiers (http://www.doi.org/) registered with Crossref (https://www.crossref.org/) by article and by supplemental material to ensure long-term retrievability of the published record. This guide serves as a step-by-step guide on how to register DOIs if your journal uses ]u[ Ubiquity production services, but you have opted out of the DOI management package.
Choosing a DOI prefix
In order to be able to assign DOIs to the content of your journal, your publisher needs to set up an account with Crossref and receive a DOI prefix, unique to your publisher.
From then on, you can register any random combination of letters, numbers and characters for the suffix of the DOI. For the sake of good journal-keeping, it makes sense to choose a set format and use it consistently for every published item registered. We recommend the following structure: journal abbreviation [dot] submission ID from JMS - eg: aa.136. Please let the ]u[ Ubiquity production team know your registered prefix and chosen suffix in advance so that the typesetting team can set up the JMS properly to ensure the correct DOI is registered. With the exception of registering the DOI with Crossref, all relevant steps will be conducted by the production team, including choosing the DOI according to your selected structure, attaching it to the PDF, and entering it in the JMS on the article’s publication day.
Registering a DOI
a DOI can only be registered on the same day as an article is published.
On the publication day, the production team (journalproduction@ubiquitypartnernetwork.com) will send you a notification email with the subject:
Notification of your article published in [journal title]
for example:
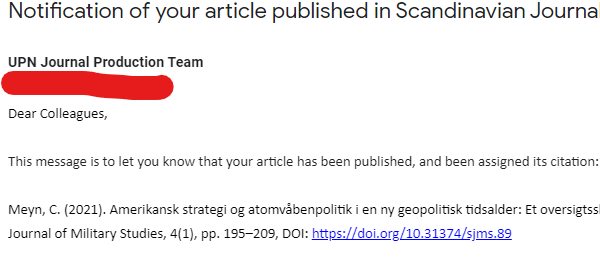
The email will contain information regarding the published article, such as the title, the authors, etc. There will also be a DOI link in the format (https://doi.org/) [DOI prefix].[DOI suffix], but it won’t be functional yet. This is a prompt to register the new DOI.
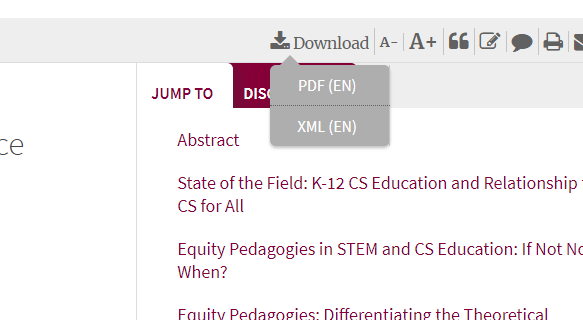
Navigate to the journal website. Here, in the right-hand navigation, you should see the relevant article with the publication date next to it. Please click on the article to reach the article page:
Download the XML version of the article by clicking on ‘download’ in the top-right corner and clicking on XML:
Now proceed to Crossref’s DOI deposit form at https://www.crossref.org/webDeposit/. Click on ‘NLM file’, and you will be prompted to log in with your Crossref account details. In the next screen, you should see this:
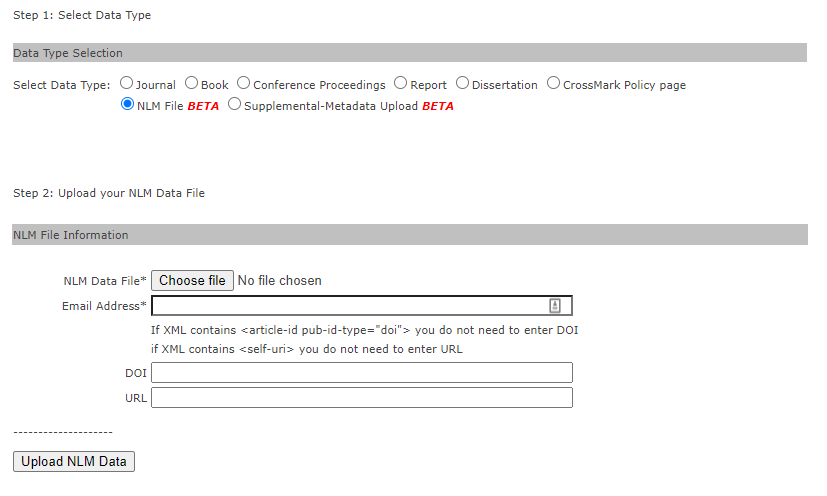
Upload the article XML by clicking on ‘Choose file’ and navigating to the XML that you downloaded from the journal website. Enter your private email address in the Email Address field to receive a notification email and error log. Please leave the bottom two rows empty - the DOI of your choosing is already set by the typesetting team within the XML. Finally, please click on ‘Upload NLM Data’.
Check your emails. You will receive two - the first normally with the subject line
‘reports’ which is just a copy of the XML you provided. This can be ignored.
The second email, with the subject ‘CrossRef Query System’, will contain a line such as:
<record_diagnostic status="Success"> or
<record_diagnostic status="Failure">
If success is stated, the DOI will now be registered. If you test the link sent in the article notification email, it should now lead you directly to the article page.
If a failure is stated, then an error message will be provided in the same email text, in a <msg> tag. Please correct the error and resubmit using the same method. Please feel free to reach out to the production team if you struggle with fixing the issue.